The deadlift is one of those lifts that allow you to build strength, sculpt a strong backside, and ultimately turn you into an athlete. The sad part is that many people butcher the deadlift all over the internet as well as at the gym.
The deadlift is a complicated lift but many people decide to perform in the gym with no idea what they should be focusing on.
The word prerequisites come to mind when it comes to describing the deadlift. There are specific characteristics that one should obtain before trying the rugged and raw straight bar deadlift. Every single person in this entire world should be deadlifting in some shape or form, but, just like everything else, your approach to deadlifting should be individualistic and not what you’ve seen in a fitness magazine, Youtube, or Facebook.
Here’s a simple test to determine whether or not you’re ready to deadlift off the floor.
Ready?
Perform a simple toe touch. Touch your toes without bending your knees.
Go!
Couldn’t touch your toes? This mini assessment explains a lot about how your body moves and what will happen when you try to put yourself in the deadlift position. Not being able to touch your toes indicates that when we reach down to the bar the musculature on your backside (hamstrings, QL, glutes, adductors, maybe even external obliques) that are “stuck” meaning won’t give you the necessary range of motion you need.
What does this mean? You’ll most likely injure yourself down the road with your compensated form and will end up in a constant battle of pulling something, your back “buckling” or merely hitting a plateau in your deadlift numbers and leave with a sore back.
What should you do instead to prevent this horrible limbo deadlift space?
Proper progression and know when to regress aka troubleshoot when something pops up in training.
Now, remember when we spoke about prerequisites earlier? These can also mean showing proficiency in other exercises that can lead up to the beloved straight bar deadlift.
Let’s go through a couple that you should start with if you are new to deadlifting or currently dealing with a low back injury.
The dowel hip hinge is where you should start to teach the foundational movement to deadlift. If someone doesn’t understand the difference between a squat or deadlift, that someone will end up having a difficult time lifting the bar within the path a typical deadlift goes. By giving cues such as “push your butt back” or “reach your butt out like there is a chair far away from you” people immediately understand the concept of hinging, and not squatting.
Another way is using external feedback with some objects. In the video, the use of a dowel and bench. The dowel is placed on the bum with the arms in a supine position to promote better postural alignment as well as lat engagement, then, while squeezing their “lats” as they are crucial to the success of a show-stopping deadlift. Adding the bench behind the client also reinforces the hinge pattern. Keeping your calves on the bench throughout the entire movement to maintain a hinge. If your calves come off the bench, you will fall into a squat pattern, which we don’t want, and is the first step to teaching the difference between the two.
The next step is a weighted deadlift with a kettlebell to teach you about tension and to learn to lift things off the ground without hurting your back. This step is probably the most crucial step for the general population to prevent low back pain from everyday activities like picking up their children, housework, helping someone move, etc.
If you can’t touch your toes, start in an elevated position. You can use foam pads, or grab two 45lbs plates, stack them together and place the kettlebell on top. For those people who could touch their toes, still start here as the analogy of your body is a Ferrari, but that doesn’t mean anything if you don’t have the brakes of a Ferrari to slow down when needed comes to mind. What happens to a car without brakes? You crash. Let’s learn how to use our brakes efficiently so when we speed around a corner at 90 mph we don’t spin out of control.
By shorting up the distance to the ground, you allow yourself to prevent compensation of any other body part.
If you had to regress this further as you might have had an issue of pain sensitivity from a car accident, for example, you could quickly raise up the distance. Using more foam pads or two more 45lbs plates. There’s nothing wrong learning how to deadlift with 6 inches of weighted movement. If your body only allows you that much distance, then own it, increase the weight, and build confidence.
After a while, you can either go up in weight in the elevated position or, start removing the foam pads/45lbs plates away until your deadlifting off the floor. But remember, you need to have a beautiful flat back before progressing this exercise further.
Also important to note is creating tension. With the kettlebell handle, think of “creating a death grip like Darth Vader.” Immediately everyone crushes the handle like they want to break it.
By learning the death grip, it sends a signal to the rotator cuff that you’re about to lift something heavy, and the rotator cuff then sets the shoulders in an optimal position, lats behind to engage and viola! The back becomes a beautiful flat launch pad ready to lift something.
Sometimes learning how to deadlift people may mention they feel it in their backs. When a client points to the bottom of their low back (think L5, L4), then we got a problem. If a client points to their low/midback (think T12, T11 or even T8, T7), you shouldn’t be worried. When they describe a sensation in their back around the low/mid back junction that isn’t a sharp shooting pain, but “I feel it” that’s most likely their paraspinals, erector spinae, and lats engaging to keep them upright and erect. Considering 99% of the general population sit at a desk or in a hunched over position being put into a straight neutral spine to deadlift will definitely turn on these muscles and work them. They will feel muscles turn on like they never have before. Going from 10 hours at a desk in forward flexion to, tight, rigid, neutral spine, with good form to pick up something heavy will be a sensation they haven’t felt before and won’t know if it’s good or bad.
The moment they point to their lower back where L5 and L4 sit, then we have to adjust, so their lower back doesn’t become the fulcrum for every hip hinge pattern we put them in. There are a couple of ways to fix this poor movement pattern the client is performing.
Here is a check list:
1. Evaluate your position. Most of the time it’s a simple fix of moving your body forward over the bar/kettlebell. The moment someone is too far back and tries to lift the bar or kettlebell all the weight is transferred right into that lower back, which we don’t want. But, if you move just a smidge forward, hover over the bar, all of a sudden the weight distribution changes, and you’re good to go.
2. Switch up your stance. Something as simple as turning their feet out and going wider to almost a sumo stance can make a world of difference. Most likely an indivisual sitting at a desk 10 hours a day, then an hour driving home from work, an hour at the dinner table, then an hour or two on the couch watching Netflix. Is this person going to have tight hips? Of course! Do they need to have a perfect conventional deadlift stance? No. Adjust the deadlift position to what works and feels better. There is no rule against it, make it work for you. As long as you mimic the hinge pattern and it presents no pain, load it and keep going.
3. Elevate it one more time if needed. By shorting the distance can quickly make the pain or “feeling in the low back” go away. Remember, pain and “feeling” are feedback from the body and nervous system. It’s trying to communicate with you. It might be as simple as “you’re not ready to go that low, back off,” so listen and adjust.
After working out the kinks and you’re comfortable doing deadlifts with the kettlebell elevated there are a few ways to progress from here.
1. Double Kettlebell Sumo Deadlift
This exercise is where you should go next, you can load it heavy, and you’ll start feeling strong in the gym. If you have a standard set of kettlebells, you can load this up to 48kgs (two 24kg kettlebells), and that’s already 110lbs of weight which is challenging enough for the average person.
Same coaching cues apply to a regular single kettlebell deadlift. The only thing to watch out for is the hand positions. Sometimes having the kettlebells to deadlift will cause some people to knock the handles together. A simple cue and switch are to invert the handles a little, so you have some space during the movement of the deadlift.
2. Trap Bar Deadlift
The next progression is to get into is the trap bar deadlift. It’s back friendly, and it works well for almost everyone to figure out the deadlift pattern.
Starting in the center of the trap bar. Look down to ensure you are in the middle. The moment you’re too far forward or back will cause the lift to fall apart, similar to the regressions above. Hand position is crucial for the trap bar. Ensuring the hand’s grip in the center of the handle will bulletproof the angle of pull. From here, directly apply the “death grip,” drive up, and lock out at the top.
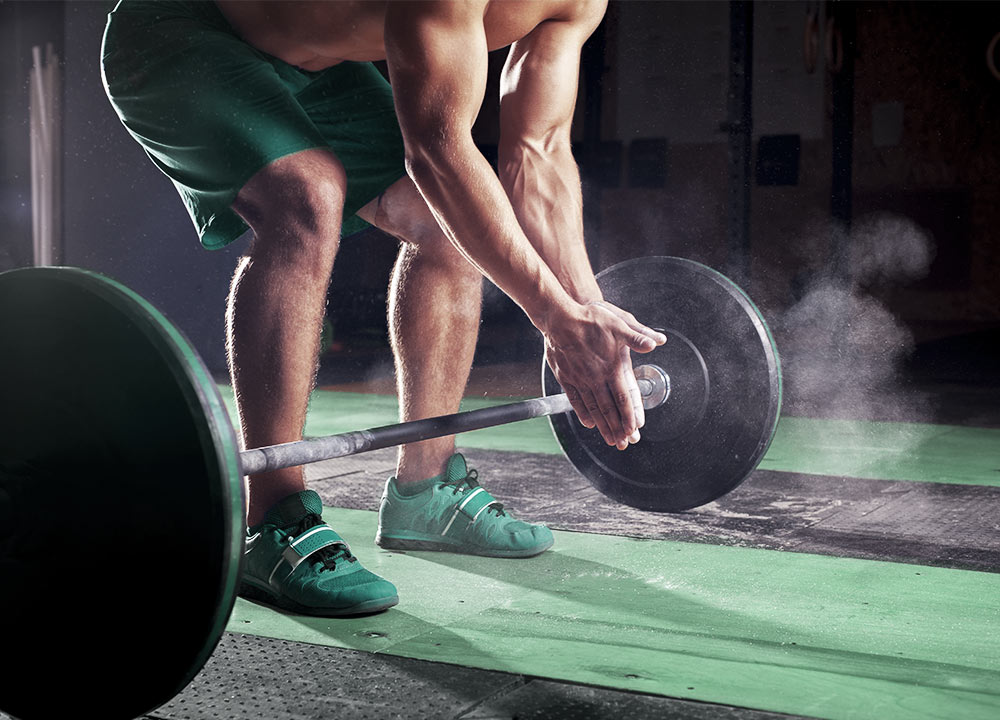
3. Finally, The Barbell Deadlift!
Once you go through the above progressions and show proficiency, our next step is the conventional straight bar deadlift.
At this point typically, you should be able to move well, have no pain, can touch your toes, don’t have too many limitations through the hips. With this list checked off, you should see a decent looking deadlift!
The cues you should think of while deadlifting with the straight bar are:
– bow forward to the bar
– reach down, squeeze the bar like you want to break it
– push your feet into the ground
– drive UP through the hips
– Squeeze the bum and lockout at the top
The other point I want to mention is foot position. You should have a closer stance than the typical “shoulder width apart” stance. I find that too many people when they come down from the top position in the deadlift, their hands almost slide too close to their knees, and then the knees tend to collapse in.
When it comes to hand position, I coach a position that feels comfortable. At the same time, I won’t allow people going into a snatch grip, or go so narrow that they are always touching their knees with every rep. Find what position works best for the you and go with it.
Another great tip is foot position. The deadlift doesn’t have to the be strict “both feet pointing forward” stance. Depending on the person they might need to rotate the feet out to get into a neutral deadlift position. Find what works and stick to it!


Leave A Comment