
This idea of “turning on your core” sounds silly as if your “core” wasn’t turned on in the first place your entire body would not function and fall apart.
But, in the world of fitness and health words like “activate” “turn on” “fire” “my core isn’t firing” and other words and phrases like these are regularly said during a training session. To make things simple, if a particular muscle of your body didn’t work, the majority of your body would fall apart, and you’d end up looking like a melted candle.
But when coaches say things like this the client will understand and want to work on their poorly functioning core muscles.
Now, let’s get an idea what the “core” is. Many people only think its the muscles around their abs or worst yet just their six pack abs. In reality, your core is more than just the muscles surrounding your belly button.
Doing a simple Google search, you’ll find millions of different images when you search for “anatomy of core muscles.”
Here are three images you should pay attention to when defining what your core is made up of:
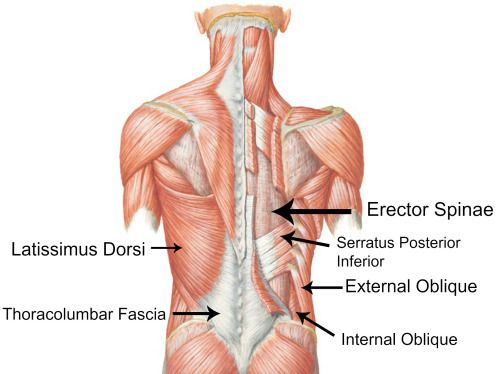
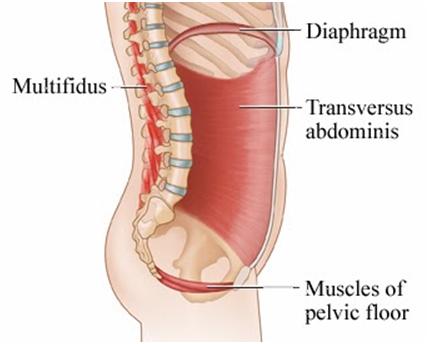
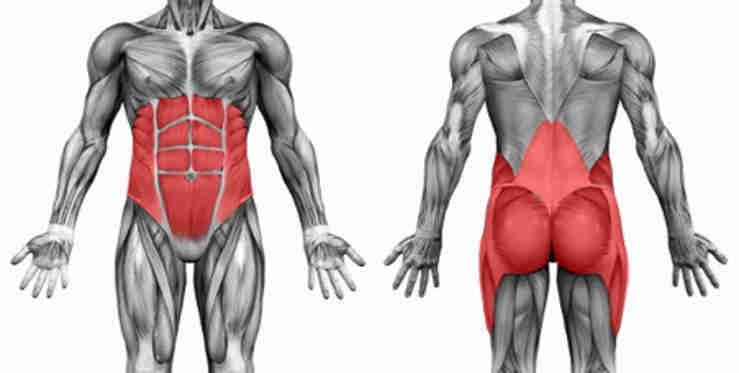
Here’s a quick list of muscles that function as your core:
Transverse Abdominus aka “T.A,” multifidus, internal oblique, diaphragm, serratus, quadratus lumborum, pelvic floor, erector spinae, latissimus dorsi, glute max, min, and med, and finally rectus abominus.
All of the muscles listed above all work together to keep you stable, moving, breathing, and prevent you from hurting yourself when you decide to bend over hopefully in a deadlift pattern to pick things up off the floor.
Core activation starts with simple breathing. Do you breathe through your diaphragm?
Watch this quick video tutorial with Dr. Sarah Forster from Restore Rehabilitation that explains what diaphragmic breathing is.
In the video, you’ll notice the hand position that Dr. Sarah is holding. One hand on her belly, the other on her chest. The goal of this exercise is to breathe into your bottom hand where your belly is and not into your chest. Majority of everyday people are chest breathers. They have a difficult time trying to breathe through their diaphragm, and when asked to do so they have to think about it. What this disconnection of the brain and body means is your diaphragm is “turned off” because just like the majority of people in this world who work at a desk for 8-10 hours a day crush their diaphragm and it’s difficult to breathe correctly in that position.
Taking the average person example above, let’s audit their day. Wake up, sit in a car and commute for 45 minutes, get into work, sit for 8-10 hours, get back into the car to drive home for another 45 minutes, sit down for dinner, sit down to watch TV, then sleep and repeat. 80-90% of someone’s day is sitting! Layer that with work stress and traffic stress there’s no way for you to utilize diaphragmic breathing as you should. This horrible cycle promotes the brain to go “well, you haven’t used your diaphragm for a while, I’m going to turn that off and let you breathe through your chest instead.” You then alter a basic human movement pattern, and now more problems down the road will pop up.
How do we fix this?
Simple, learn how to breathe first before any core exercise in the gym. Breathing might sound boring, but we want to build a strong foundation before we get into more advanced core exercises.
Here are two exercises you can do at home to promote proper breathing.
Feet Elevated Breathing
Having your feet elevated against a wall or on top of a bench relaxes the lower extremity muscles and allows you to access with better ability your diaphragm. I coach to put the hands on the belly for feedback. I tell clients to press against their belly lightly, and this sends a signal to your brain to fight against the pressure which then will allow you to breathe deep into your belly.
Face Down Breathing
The other variation is face down breathing. If your lower back can tolerate being in extension, this exercise will be great. I like using this variation as you have instant feedback when trying to breathe into your belly. The floor acts as your feedback. If you can’t breathe into the floor, you’ll automatically know where you need to fill your “canister.”
Don’t think of diaphragmic breathing as pushing and filling just your belly. The idea of a canister or a belt around your stomach goes around 360 degrees. Breathe in so your abdomen, obliques, and even erectors, all your muscles surrounding your torso should inflate like a balloon.
To set up, simply lay down on your stomach, both hands crossed and have your forehead resting on them, breathe in, and out.
Now, that we’re breathing let’s get into some more “advanced” exercises that will develop a strong and powerful core.
Bird Dogs and Deadbugs!
Made famous by the intelligent Dr. Stuart McGill, bird dogs, and dead bugs are the cornerstones of proper core function and strength. Many people who tried these in the past have mentioned these are easy, but with correct coaching and cueing you’ll be able to create a strong core exercise that can efficiently be progressed and challenging.
Bird Dog
The reason why the bird dog is beneficial is the lower back region supports most of the body but is prone to damage, either from back injuries or an inactive lifestyle, such as long periods of sitting at a desk. The bird dog strengthens the stabilizing muscles around the lumbar region and also focuses on building strength and stability in the hip capsule and shoulder joint.
To set up, get into a quadruped position. (hands and knees on the ground) Be sure to have your knees directly underneath the hips, and the shoulders directly overtop your elbows and wrists. Initiate the movement by reaching and kicking out with the opposite hand and leg. (Left arm reaches out, right leg kicks out) Think of reaching as far as possible making sure your bicep is in line with your ear, and kick out leading with your heel and squeezing your glute to finish the movement.
Dead Bug
The dead bug exercise improves balance and stability. It can enhance the control of the spine and the posture while the body is in motion or if it is still. Also, the dead bug exercise can help stabilize the pelvis, spine, and ribs to be able to withstand force which is crucial when wanting to deadlift some weight off the ground.
To set up, lying on your back, lift both arms and legs into the air. Similar to the bird dog but upside down, knees are directly over top hips, wrists and elbows are over top shoulders. Initiate the movement by reaching and kicking opposite arm and leg, hold the position for a slight second, and return.
After a while, bird dogs and dead bugs may become easy and stale.
Where do we go from there?
Here are some variations you can use at the gym:
Stability Ball Bird Dog
Bird Dog Cable Row
Bird Dog Sandbag Pull-Through
Dead Bug Stability Ball Squeeze
Dead Bug on Foam Roller
Dead Bug with Kettlebell Pullover
Chops, Lifts, and Anti Rotation Presses!
After learning how to breathe and performing bird dogs and dead bugs correctly, moving onto some chops and lifts that were made famous by Grey Cook.
The Chop and Lift are bilateral upper extremity PNF patterns that have been used by physical therapists since first described by Margaret Knott and Dorothy Voss in 1956 (Voss, et al., 1985.) The spiral and diagonal movements in the Chop and Lift patterns were often found to be more effective in assessing and treating dysfunction than traditional single joint motions.
You’ll notice these are done in a half kneeling position. Kneeling postures help reduce input from the lower extremities, which often substitute for weaknesses in the core. A kneeling position also minimizes the speed of movement relative to a standing position. Being in a half kneel position also helps stabilize the hip to develop better hip stability to translate into better movement patterns and performance on exercises such as single leg deadlifts, lunges, running, etc.
Here are some exercises in the half kneeling position:
Anti-Rotation Press
Half Kneeling Lift
Half Kneeling Chop
After mastering foundational core movements, you can to start throwing in plank variations.
Here’s a progression of plank exercises you can start with:
Sprawl Plank
Half Side Plank with Leg Lift
After showing proficiency in these exercises, you can progress into some variations to stress the system a bit more to bust through plateaus. But for the most part, if you position yourself correctly in each of these plank exercises 30 seconds will be enough to create a training effect.
If you can’t hold a 30-second plank, a brilliant way to build up your capacity to a full 30 seconds is to break it down. For example, come up into a side plank for 10 seconds, come back down, reset, then back up again for another 10 seconds. Break it down even further you can do 5-second holds instead. Everyone is an individual so make the call to progress yourself safely.
Here are some more advanced plank variations:
Half Side Plank with Cable Row
Rotational Front Plank
TRX Side Plank:
Bear Crawl
Another essential movement pattern for core building is anti-extension movements like rollouts. Rollout variations are advanced for most and can even injure some people. Starting people with small incremental steps and limit the range of motion and then build up a tolerance to how far out you reach is a safe way to start. Rollout exercises are great for those who want a “six-pack” without giving them crunches which can cause more harm than good on your spine and discs.
Here are some rollout exercises to start:
TRX Kneeling Fallout
Tall Kneel Stability Ball Rollout
Stability Ball Saw
Ab Wheelouts
Core rotation exercises are also necessary for sports performance and your everyday Joe and Jane who loves to play hockey, golf, or any rotational sport. Being able to create tension and relaxing during rotational movement is essential to any physical activity that requires you to go across the midline.
Here are some rotational core exercises:
Cable Chop
High to Low Cable Chop
Low to High Cable Chop
To finish off, throwing in carrying variations to build up grip strength along with core strength is also vital. The grip is usually forgotten in training but when you think about it every time you go to the gym your holding either a dumbbell, kettlebell or barbell in your hands. You’d think you’d want to train your grip a little to not feel limited when you grab that heavier dumbbell and your grip fails you and you can’t perform the exercise.
Here are some carry variations you can use:
Kettlebell Inline Farmer Carry
Single Arm Kettlebell Farmer Carry
Single Arm Bottoms Up Farmer Carry
Now, you should have a whole arsenal of core progressions to get started with, and you’ll be able to build a strong and resilient core. Don’t fall victim to crunches or any flashy exercise you saw on Youtube, trust the process and you’ll notice you won’t be in pain and will gain strength over time in the gym.


Leave A Comment